

To present this guitar I will do the accompanying text in English.
Very little can be found on the Internet and even AI only tells us
the story my friend, Ton Bogaard already wrote on his site:
guitarrasvalencia.wordpress.com where a lot more can be found
around the several luthiers that were active there. This example
certainly is one of them but when you know that a lot of parts
and even ornamentations were ordered at companies specialized
in this sort of "guitar additions" it remains difficult to give a
guitar its' final place and origin. Scale: 640 mm Width topnut:
50 mm. Body's own frequency: G# = 104 Herz.

A "luthier" called Pedro Talavera could be responsible for the
building of this guitar but assumptions are already there that
these Talavera labelled guitars are coming from Salvador
Ibanez, Jose Parres or even Jaime Ribot. When the inner
wood work of those luthiers can be studied we can possibly
say a bit more.

A good friend of mine who is a good photographer "repaired"
the label to a very useful one. Besides the missing corner the
riss near the centre of the label (due to a crack in the back)
has disappeared. Simply great work!

To my opinion this is an outer heel form that the Valencian
luthiers often made during the existence of the Salvador
Ibanez workshop and later with his sons.

As I stated earlier sometimes a company gave exclusive rights
to an importer or exporter and to avoid legal problems a kind of
"fantasy name" not really existing, was put on a label. Moreover
on this "Pedro Talavera" label there is no adress to be found
which is of course remarkable and in fact underlining the
supposition that it is a "fake" label most likely used by "Hees".

For a 125 year old guitar it is remarkable that the soundboard
is completely crack free! Cleaning it and maybe give a few
layers of French polish will do the job.

These are some of the more severe problems I will have to deal with:
A lot of cracks in the back. Maybe veneering could be the solution.
Or replacing? I will discuss that the coming week with some people.

As there are too many cracks on the back I figured the first step would
be to remove the back and inspect all the glue work, also from the
soundboard. A very strange way of placing the glue blocks, though!
I will come up with more pictures regarding that move.

A rather wildly figured back. Beautiful for people that are less
interested into construction as these backs are more prone to
cracking. The rather "dull" (or straight) figured backs will hold
much longer. The heel on this guitar however is more rounded
as opposed to the heel on the 1900 Siccas example.

You can click on this picture to study the beautiful inlays
of which only one piece is missing! Exactly this rosette can
be found on a Siccas sold Salvador Ibanez guitar from 1900
As often! Steel strings were mounted on this guitar.
Never do this as a steel string set will pull on the bridge
with almost two times the force of a nylon string set,
around 75 kilograms.

A centre inlay that stops when reaching the top.
Most of the time the inlay is all the way up! On the
Siccas sold Salvador Ibanez from 1900, the ornamen-
tation also hasn't been inlayed to the top of the head.

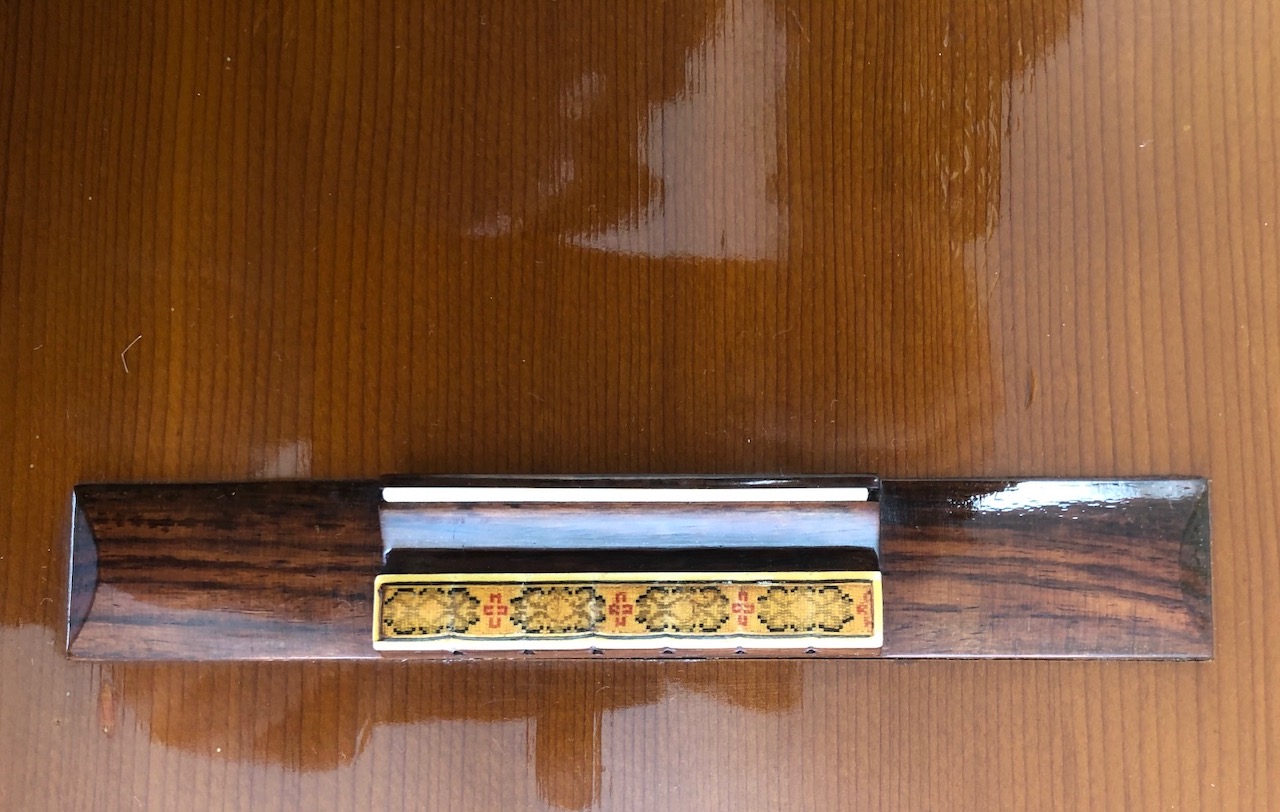
And here is the combination with the bridge that has been lowered
but can be restored to an almost original looking bridge of that
time. The soundboard has been equipped with a 5 fan bracing.

To date this guitar even more exactly: The inlay on this bridge
can be found most of the time on guitars around 1900. The square
outer ends were a bit later invariably replaced with rounded outer
ends. When the sons of Salvador Ibanez were in charge, the return
to the square appearance was done. To be continued.

This picture has been taken from a YouTube video that
is about the restoration process of a Salvador Ibanez.
The slightly slanted transverse bars immediately will
raise questions, especially when luthiers are involved.
The label on the guitar on this picture also dates this guitar
to be from around 1900 as the exact year has been written
on this label. As the guitar here above is a so called
"Resonator" guitar, it has been mentioned on the label.
It would be better to give my guitar a 1898 - 1902
label when Salvador Ibanez also was busy on the
Bajada de St. Francisco 23. But at first I will be certain
this Pedro Talavera guitar is really coming out of the
Salvador Ibanez workshops. but let us not forget that
several employees in the past worked further on their
own by learnt the craft at the Ibanez workforce. To
name Frederico Pau who later delivered instruments
to Telesforo Julve. And also Juan Ponce made
instruments that were exported to the north of Europe
by Jose Cortes. He also built that typical high end
Valencian guitars in the traditional Salvador Ibanez
way as probably did quite a few others at that time.

An example of a guitar built in this tradition: A Julve
high end guitar built by Juan Ponce (?)


And here the guitar, presented with its' back off.
It will be possible now to check all the glue work
but to prevent future problems some extra moves
have to be made. Though this top is completely
free from cracks as often most of the time some
problems at both sides of the fingerboard in the
soundboard may occur in the future, especially
when the transverse bar closest to the heel hasn't
been sturdy glued anymore. A small second bar
will be added. The sound won't change. I will also
equip the sides with some braces here and there
and inspect and if necessary, reglue some glue
blocks. A new glue strip for the back is of
course inevitable. According to the tradition
in those times it will be a non carved strip.

As I've mentioned earlier the slanted bars on the back.
Though the guitar possibly receives a new back in the
near future, I will securely replace these bars the way
it has been done on the old back. A possibility is the
veneering of a new piece of wood with this old back.
It is always advisable to keep the transverse bars on the
back (and front) a bit shorter as when temperature changes
are involved they will expand and thus damage the sides.

Only one repair on this side of the guitar, a bit clumsy
done with paper (!) but what is immediately noticeable
are the glue blocks. The alternate placement of the glue
blocks I already knew from the Telesforo Julve guitars
but this is even more work and possibly could have
influence on the freely vibrations of the soundboard
to my opinion. A befriended luthier suggested it could
have been done to strengthen the soundboard as the edge
inlays are quite big in width. Those longer strips glued
to the soundboard can also be seen in the Salvador
Ibanez guitars but here these blocks have another
glue block placed on top.

Alass, a bit damaged during the back removing process.
I can have it cured as a girlfriend of mine is really good
at digital repairing this label. A "complete" label will
be delivered with the sell of this guitar.

The form of the inner heel block can also tells us a
lot about who actually built this guitar. To my opinion
exactly the same as sculpted in the Salvadore Ibanez
guitars of that time.

The endblock is much too thin to my opinion as are the
glue strips for the back. As this is the possibility to make
a real neck reset, glue work has to be done in a proper
way. By diminishing the distance inner heel / end block
you are able to change the angle neck / body and thus
you can create a very well playable guitar without
having to change the fingerboard and fretwork. In fact
we're talking about a neck reset.

OK, on the picture it all looks still reasonable but in
reality I doubt if I can reuse it. When making a neck
reset the plantilla will be slightly different so I will
need some extra pieces to cure that. Maybe too much
work and what will be the result? I do not expect
a new back will diminish the sound qualities.

Some side reinforcements to prevent problems (and cracks)
in the future. Also an extra transverse brace has been placed
above the original one that is glued just above the soundhole.
When that brace loosens it more than often happens that
the soundboard is developing cracks alongside the
fingerboard. In present times most builders are placing
such an extra brace to prevent those damages due to the
tension in that area, most of the time even wider executed.
Also some soundboard braces have been reglued. Making
everything free from glue traces caused by spilled glue is
in fact not necessary but gives a much neater appearance.

I've made the glue strip for the back a bit more wide in order
to compensate the changed plantilla that occurs when removing
the back. Making a wider centre strip was an option that came
to my mind but then all the inner (original) woodwork around
that centre part of the back would have to be renewed.

It remains a bit strange: this way of placing the glue blocks
for the soundboard and in fact labour intensive. It must
have been an experiment from one of the workers at the
Salvador Ibanez workforce and maybe therefore this guitar
has been provided with a "Pedro Talavera" label (?) but also
on the Salvador Ibanez guitar with a wider edge inlay the
extra length glue blocks on the soundboard are present.

As I was forced to make a neck reset some extra glue
surface on the endblock was advisable to my idea.
Therefore I've thickened that part a bit.

And yes, I've decided to keep the original Brazilian /
Indian rosewood back as it is a part of this guitar and
history around the Salvador Ibanez workshop.
During restoration it is always good to make pictures.
So here the repaired back has been reinstalled, with a
serious neck reset in mind. It is a tedious process to do
it the right way. I had to make some extra tools before
I've glued the repaired back to measure the distance
between the heel and the endblock that was enough to
finally give this guitar a good playing action.

Here and there it will be necessary to glue some splints
of wood to the surroundings to fill out the 'spaces" here
and there. The slightly wider glue strip for the back
enables me to reduce that to the minimum.

Some cleaning sessions with alcohol will clean the sound-
board before some final French polishing layers will be
applied. The bridge here has been remodeled as some-
one replaced a part of it but did that in a bit clumsy way.
However, it was a wise decision to built in a sort of
octave compensation to keep the guitar in tune,
especially in the higher positions.

The first layer of shellac liquid. Of course the final result on
both sides and back will be much darker and most likely in the
way it was when the guitar was just finished. Over time these
lacquers are becoming more yellowish in appearance.

I've checked the neck / body angle securely and the guitar
can be played now with a nice action. The strings are already
mounted and an experiment with different brands of strings
made it obvious that it results in a lot of difference in tone

What a nice view on a hundred and twenty year old
guitar. Some missing pieces of pearl along the edge
have been replaced during this restoration.

The back needs a final polishing turn but it is better to wait
when the layers of French polish have been hardened out.

Even the back is in a good condition again.
With a good eye detectable repairs of course
but absolutely satisfying to my believe.

With strings on. You want to check playability and
when needed lowering the bridgebone. That wasn't
necessary. I have changed the topnut for a better
spacing but I will keep and supply the original
topnut for the future owner of this guitar

Heart of this instrument is of course the undamaged
soundboard. I've decided not to put any label in this
guitar but I can prove the "Pedro Talavera" label
was in this guitar. However, too much specific S.
Ibanez building features are pointing towards this
luthier so a time correct label will be supplied as
well. Maybe place both labels in this guitar?

Heart of the problems was the cracked back for me as
a restorer. But removing it gives you two advantages: All
the glue work inside can be checked and if necessary
reglued. The traverse bars along with some cleats will
ensure a stable back again.

By clicking on this picture you can even enlarge it.

In the times (around 1900) when this guitar must have
been built, luthiers didn't built in a compensation for
a correct octave pitch (12th fret) That was for two
reasons: The playing action on these old guitars was
much lower and that all along with other strings.
Another restorer corrected this and I gave it a more
natural look afterwards as it is here on the picture.


The head received some layers of French polish as well.
A remark should be made around the tuners as they are
as old as the guitar itself (time correct) but do not belong
to this guitar as they are different from each other. For that
reason they also work in a different turning direction.
People that are aware around the mounting of tuners will
even notice that the worm gear should be placed in front
of the gear wheel, so the other way round as can be seen
here. That was customary until about 1910 / 1920.
Mechanically spoken, this works much better. On the
picture right the extra "shaved" lower outer end of the
sleeves can be studied: Exactly the way you can see it on
the genuine Salvador Ibanez guitars.

I always add this picture to show that these frets
will serve the future players for years to come.But the
more critical player maybe favors a bit higher frets
with steeper fret ends. Often the fret ends are rounded
for a more pleasant feel but with pull offs played on
the highest string a finger more easily slips of the
fingerboard. The new top nut placed by me has a
better spacing especially for the lower strings.
Again the back of this guitar as the name of the retailer
(from The Netherlands) can be seen here: Hees & Cie.
Internet will provide you with even more information
around this music retailer. Furthermore I found out that
Hees imported guitars from Vicente Padres and it is
possible that that luthier is responsible for this guitar
as well as he also built these highly ornamented
guitars in his career.
Terada Klassieke gitaar Model 800

Een vreemde eend in de bijt! Jawel, een model 800
Terada klassieke gitaar uit het begin van de zeventiger
jaren. Daarna concentreerde deze maatschappij zich
meer op steelstrings en electrische gitaren. Ze bouw-
den instrumenten voor bekende Amerikaanse produ-
centen en doen dat nog steeds o.a. voor Gretch.
VERKOCHT.

Deze gitaar was in weliswaar gave maar erg vieze conditie.
Daar is nu alles aan gedaan o.a. met het wondermiddel NIKCO,
een opfrisser voor allerlei gelakte houtsoorten. Aanbevolen
en gebruikt door diverse vioolbouwers.

Natuurlijk, de gebruikerssporen blijven maar het hout
heeft weer een diepe glans. Een degelijk gebouwd instru-
ment dat mede daardoor een goede klank heeft meege-
kregen. Frets opgefrist en de toets weer strak gezet.

Het label met de naam "TERADA" in goud en daardoor
wat lastiger te lezen. Made in Japan mag niet ontbreken.

Ook van een mooie rozet voorzien. Inlegwerk en
dus geen geplakte variant van deze Moorse invloed.
Ook de kam, een mooi stuk palissander is
voorzien van een inleg op het snarenblok.

De kop is ingelegd en de mechanieken hebben
een intensieve schoonmaakbeurt ondergaan.
Breedte topkam 49 mm. Mensuur 650 mm.

Het opfrissen van de frets beinvloedt het speel-
comfort in enorme mate en datzelfde geldt ook
voor een weer strakke en schone toets.

De originele mechanieken met een vreemd soort van
plastic voor de stemknoppen. Maar er kan ook een
van een ander soort materiaal gebruik zijn gemaakt.

De achterkant, een beetje saai maar ach, van stevige
bebalking voorzien en op wat krassen na gaaf.

De rollers moesten ook schoongemaakt worden
vandaar dat de snaren er hier nog niet op zittten.
Geen fretslijtage dus een directe vlakbeurt was niet nodig.
Ditzelfde model wordt op de bekende site van "REVERB"
aangeboden. Met een prijs die daar tweemaal zo hoog is, kan
je nagaan dat dit exemplaar je de kop niet hoeft te kosten.
Restauratietips
Een te hoge actie bij een al laag kambeentje.
Het is natuurlijk niet allemaal in een vloek en een zucht te vertellen. Wel dat een
bijvoorbeeld te hoge actie meestal toch niet door een neck-reset wordt opgelost.
Dat is meestal de toets naar de kop toe iets meer afschaven / afschuren nadat
je de frets hebt verwijderd natuurlijk. Die koperen frets, vaak te vinden op de goed-
kopere Valenciaanse studiegitaartjes uit de zestiger jaren zijn te vaak plat afgevijld
en daarom vervang ik deze sowieso meestal omdat ze niet comfortabel spelen
of al ver versleten zijn op oude gitaren.
Toets vervangen / halspen installeren:
Over het dunner maken van de hals en toets gesproken: Wat ik bij die studiegitaartjes
vaak meemaak is dat de toets nu juist bij de kop dikker is dan bij de 12e fret en/of
verder. Dat vind ik cosmetisch gezien nu juist lelijk. Maar los daarvan, veel van die
gitaarhalzen voelen nogal bonkig (chunky) aan dus wat minder mag ook. Dat het
dunner maken van de hals en/of toets de nek er niet stabieler op maakt is in zekere
zin wel waar maar meestal heeft het vaak te kort gedroogde hout bij die oudere
gitaren het meeste van zijn werking wel achter de rug.
Dan toch maar een truss rod installeren?
De StewMac methode is absoluut degelijk, esthetisch en structureel maar ik vind het
wel een mug met een kanon doodschieten omdat je het toch ook hebt over gitaren die
geen al te hoge waarde vertegenwoordigen. Het proces van carbonstaven inlijmen is
in mijn ogen ook wel erg ON Spaans. Bij een getordeerd hals de toets verwijderen
(Gewoon een strijkbout op zetten) en de hals weer netjes uitvlakken lijkt mij voldoende.
Er komen geen stalen snaren op waardoor de snaarspanning veel minder hoog is dan
bij een country gitaar bijvoorbeeld. Tussenoplossing zou een ebbenhouten strip kunnen
zijn. De toets onder wat verhitting in tegengestelde richting proberen te torderen en
daarna goed af laten koelen is meestal ook maar een tijdelijke oplossing: Het hout heeft
de neiging de oude “toestand” terug te zoeken.
Het losmaken van het achterblad. Aan te raden? Vervolgens een neck reset?
Dat ligt een beetje aan de constructie. Oude Tatay’s hebben meestal een Spaanse hiel
in de kast en dat maakt het lastig. Maar ook hier kan het gebruik van een Fohn en dus
hete lucht de lijm al weer voldoende zacht maken. Anderen kiezen weer voor vochtige
watten en dan dagen in laten trekken maar dat gaat vaak ten koste van de lak en soms
vervelende vervormingen van het hout tot gevolg. Het losmaken van het achterblad
maakt het wel mogelijk de balkjes van het bovenblad weer goed vast te zetten, scheuren
te repareren en/ of een bovenblad vervorming op te heffen door balkjes met een beetje
een tegengestelde kromming erin terug te lijmen. Bovendien kan je dan een soort van
neck reset uitvoeren als de hals nog wel recht genoeg is maar geen goede hoek meer
maakt met de klankkast. Houdt dan wel rekening dat je vervorming van de zijkanten
krijgt als je het achterblad wat inkort. Bredere randinleg is dan noodzaak. Het is te doen.
En geduld is het toverwoord. Maar je kunt ook een bovenblad van buitenaf bewerken.
Naar analogie van de oude bouwers heb ik aan de randen van een Spaans gitaartje het
bovenblad wat dunner gemaakt. Het vibreert daardoor vrijer en met name de klank wordt
daardoor dieper. Op fabrieksgitaartjes worden dat soort handelingen niet verricht. Daar
valt ook winst te behalen.
Intonatie en compensatie: Wat speelt er een rol?
Voor wat betreft die oude intonatie: Er werd nogal rommelig gelijmd voor wat betreft
kammen. Op oude Spaanse gitaren (rond en voor 1900) was er geen sprake van
compensatie. De snaren lagen meestal ook lager. Later werd er door de grote bouwers
wel een compensatie ingebouwd door de hele kam een beetje schuin te lijmen. (Gitaren
van rond 1920) Een veilingmeester in Londen sprak me daar ooit eens bezorgd over aan:
"Moeten we dat niet melden, dat de kam scheef is gelijmd?” De Valenciaanse school
heeft dat tot soms in de jaren vijftig ook nog vaak gedaan. Vaak zitten de kammen er
zelf scheef op zodat de afstand snaar / zijkant hals bij de hoge snaren veel groter is dan
bij de baskant (of andersom). Een beetje mag wel maar niet teveel natuurlijk.
Betrouwbaar is dus die kamplaatsing geenszins. Je zou 1 mm compensatie voor de
hoogste snaar en 2 mm voor de 6e snaar aan kunnen houden. Beter is nog een gitaar
op te zoeken met een voor jouw perfecte intonatie en dito bespeelbaarheid met ook nog
eens de snarenset erop die je zelf denkt te gaan gebruiken want ook dat maakt voor de
compensatie uit. Daar eens aan gaan meten. Overigens zijn op die oude Valenciaanse
gitaartjes de bruggen ook groter van afmeting dan je ze in de handel kunt krijgen. Dan
moet je zelf een kam fabriceren en met een dremel en wat ander schuur, schraap en
schaafgereedschap is dat goed te doen. Ik heb het moeten doen voor mijn Hijos de
Vicente Tatay gitaartje. Eigenlijk niet echt de moeite maar het is toch Corona tijd dus
waarom niet. Je kan dan zelf bepalen waar je de sleuf zaagt.
Trouwens goede lijmklemmen maar ook complete bruggen kun je voor weinig bij
Aliexpress bestellen. Dat geldt ook voor mechanieken, toetsen en andere onderdelen
en gereedschap. Echt de moeite waard om eens te onderzoeken. Je bespaart jezelf
honderden Euro’s.
Een toets los van de hals maken? Mechanieken?
Meestal werk ik met het eerst verwijderen van de frets en daarna een strijkbout op de
toets plaatsen. Met siliconen heat pads heb ik nog nooit gewerkt maar het is wel een
slim ideetje om dat eens uit te proberen. Heb je ook van Ali Express. De mechanieken
van Ali express voldoen inderdaad prima. En voor mijn concertgitaren heb ik de zoge-
naamde Robert Bouchet mechanieken al een paar keer geinstalleerd. Deze hebben
een wat andere overbrengingsverhouding wat gewoon veel nauwkeuriger stemt.
Geklonken wormhouders waar je eigenlijk altijd op moet letten. Het goedkope
alternatief is deze as houders vanuit de mechaniekplaat buigen wat bij bijna
op alle goedkopere gitaren terug te vinden is.

Lijmstrips en randinleg? Vervanging en modellering zangbalken?
Voor wat betreft het vervangen van balkjes: Dat heb ik zeker eens gedaan bij een
oud Salvador Ibanez gitaartje. Kun je zien op mijn Blogspot van Oldromanticguitars.
Voorts heb ik een interessant idee voor het vormgeven van de zangbalken ontdekt in
een Domenico Fischetti gitaar. De waaierbebalking verloopt daar niet gelijkmatig
over de lengte van de balkjes maar de balkjes zijn net wat dieper naar het
klankgat toe daardoor meer weerstand tegen de snaarspanning biedend.
Ik was het nog nergens tegen gekomen! Zie onderstaande foto!

Ik ga er even vanuit dat men met randinleg soms ook de lijmstrips bedoelt? Vaak losse blokjes
bij de Spaanse gitaren. Een brede lijmstrip wordt in elk geval voor een bovenblad niet aange-
raden omdat je het oppervlak van het bovenblad dat trilt wat verkleind en het bovenblad als
geheel minder kans geeft te vibreren. Reden vaak waarom die grote rozetten rond het klankgat
eigenlijk vermeden moeten worden al lijkt mij de invloed op die plek niet zo groot.
Voor het achterblad geldt het in wat mindere mate.
Verbeteringen qua klank aan een studiegitaartje?
Een plan van directe aanpak kan vaak al het lichter maken van de kam zijn. Die zijn vaak wat
grof en bijna onbehouwen vorm gegeven met bovendien veel “hout” tussen onderkant brugbeen-
sleuf / bovenblad. Het contact wordt ook “directer” als je die sleuf wat dieper maakt. Kan met
een bovenfrees maar ik heb daar een simpeler oplossing voor gevonden.: Gewoon 3 bladen
van een klein ijzerzaagje naast elkaar zetten maar eerst even de vastzet pennetjes eruit halen.
De bovenkant kan je nu netjes gelijk houden waardoor het zaagoppervlak ook mooi gelijkmatig
wordt. Kan eventueel met een vijltje met de juiste dikte nagelopen worden.
Geen opmerkingen:
Een reactie posten