received a new bone nut and bridgebone.
where the prefixes S.R.C. behind the company name attests.
nieuwe topkam en brugbeentje. Wat een verschil in geluid!
Close up van de nieuwe topkam en het fretwerk.
een laat 60-er jaren begin zeventiger jaren exemplaar.
Een gitaar die weer in oude luister is teruggebracht.
Wellicht wel erg veel werk voor zo'n gitaar maar ik
laat dan vaak de klank van zo'n instrument de door-
slag geven en die was veelbelovend.
Los van de klank die er eigenlijk al was, zijn er mooie
details te bewonderen aan deze gitaar. Een fraaie rozet.
Als je dan vaak met Spaanse gitaren te maken krijgt,
weet je de specifieke bouwkenmerken ook meteen te
plaatsen. Zo is lijkt de typische punt in de bracing hier
direct te verwijzen naar de manier waarop Manuel
Adalid werkt aan de higher end Esteve gitaren. Laatst-
genoemde is dan ook medewerker in de Vicente Tatay
Tomas ateliers geweest.
Een luxere bedekking van het snarenblok lijkt een beetje
overbodig maar dit hardere materiaal voorkomt wel groeven
in het hout van de kam na langdurig en intensief gebruik.
De hoek van de hals ten opzichte van de klankkast is na verloop
van tijd ook dusdanig dat de speelactie onmogelijk wordt, doordat
de hals wat naar voren is gekomen. Het aanlopen van de snaren
vanaf de 12e fret wijst daar vaak al op. Alle frets eruit, uit-
vlakken naar de kop toe verandert de hoek van de hals ten
opzichte van de kast voldoende om alles weer correct te
krijgen en nieuwe frets zijn na het vele spelen geen
overbodige luxe.
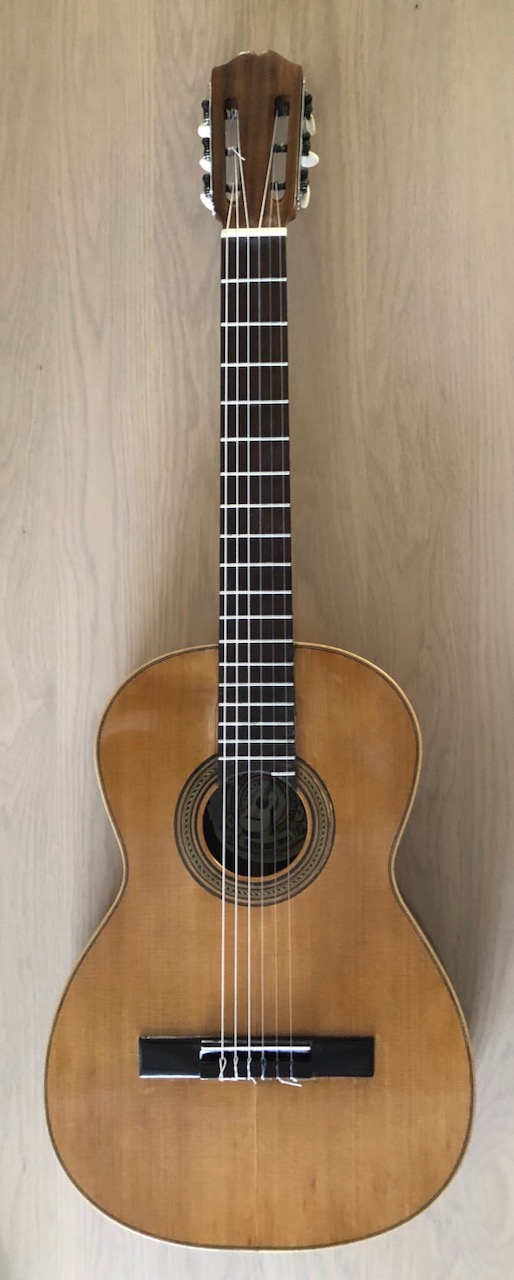
Mooie kwaliteit hout voor de achter- en zijkanten
maar geen palissander wat men wellicht zou verwachten.
Daarentegen wel weer een luxe scheidingsstrip tussen
de twee helften van het achterblad.
De min of meer "geschaduwde " hak van deze gitaar
was in feite een must omdat de hak blijkbaar schade
had opgelopen in het gebruik en een mogelijke val.
Een en ander is opnieuw verlijmd en stevig voor
jaren toekomstig speelplezier.
Ook de rozet moest gestabiliseerd worden maar daar
is na verlijming geen cosmetische operatie meer aan
gewaagd. Hoort ook een beetje bij de geschiedenis
van deze gitaar.
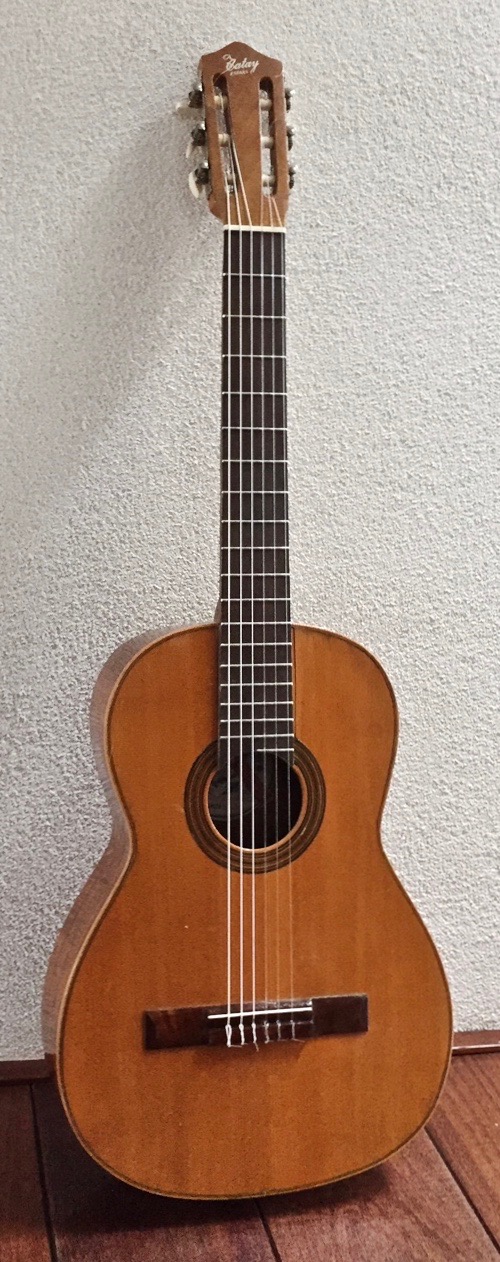
Een wat meer ongebruikelijke kopvorm, overigens wel thuis
te brengen bij de duurdere modellen. Gelukkig kan veel terug-
gehaald worden door de site van Ton Bogaard te raadplegen:
https://guitarrasvalencia.wordpress.com. Dan wordt duidelijk
dat we te maken hebben met de zogenaamde E-series. De
concert serie gitaren zouden een ebben toets moeten hebben.
De hak die nu weer geheel stabiel is.
Het label met de hals naar rechts wijzend geeft een
tijdperk aan. Dan is internet toch een schatkamer voor
dit soort informatie: In elk geval van voor 1973.
De net wat luxere mechanieken en een topkam waarvan
de groeven uiteraard op de juiste diepte zijn gemaakt.
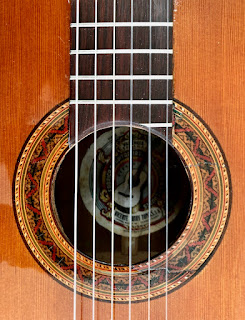
De rozet met zoals vermeld de beschadiging onderin.
Wel mooi van kleur ten opzichte van het bovenblad
Alles ziet er weer correct uit met een prettige
bespeelbaarheid.
De kopfineer is hier al weer aangepakt. Zo te
zien zelfs Brasiliaans palissander.
Toch eens even klikken op de foto om de
fraaie rozet nader te kunnen bestuderen.
De inleg in de zijkanten verraadt ook wel dat
de gitaar zich in een ander echelon bevindt.
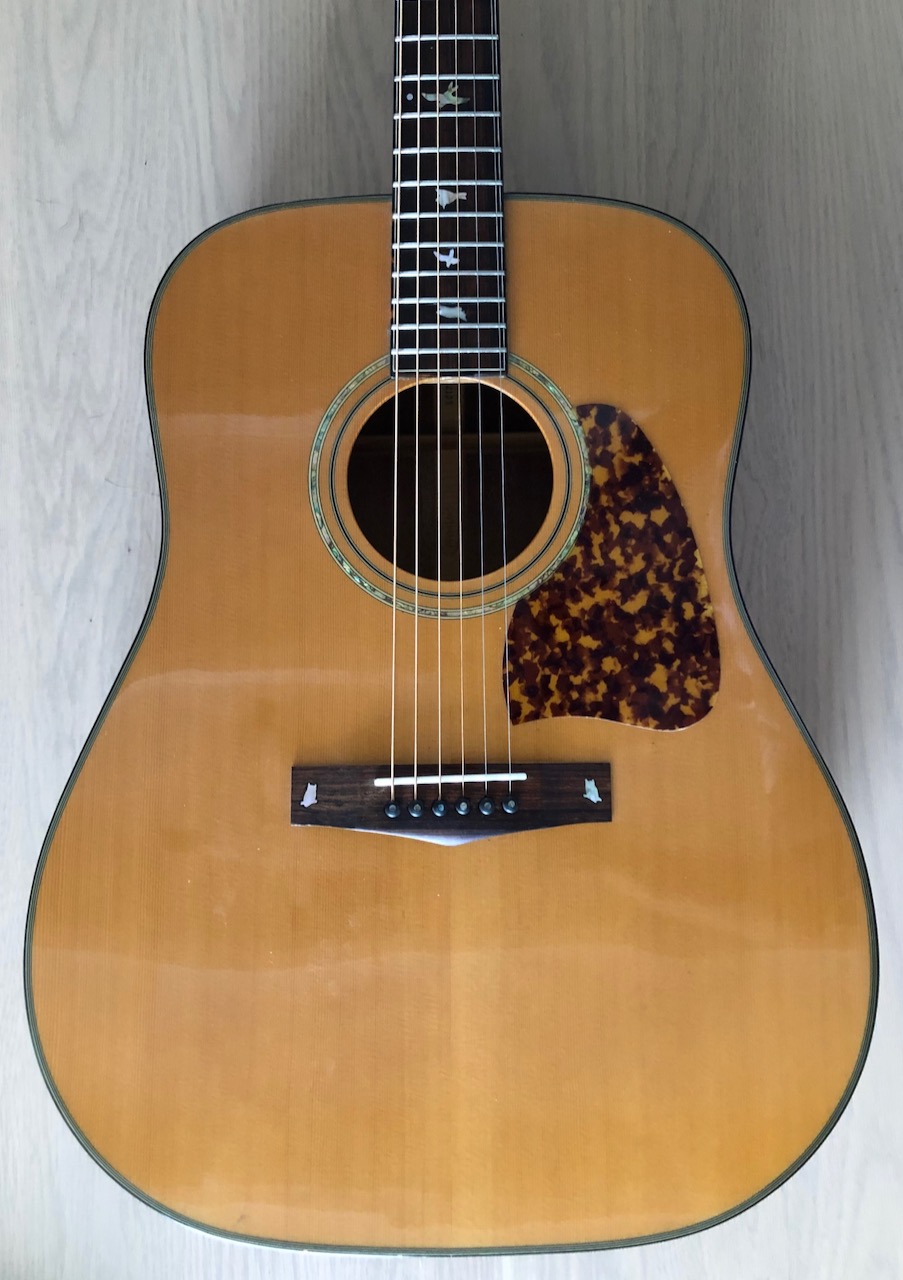
Vicente Tatay Tomas Model B-108
Let's start from the beginning but it was within 1 month
that I was able to buy a second Vicente Tatay Tomas B-108.
A lot has to be done on this one as it likely has suffered
some humidity and/or water problems. As can be seen
an extended fingerboard and together with the 5 piece
fan bracing and a scale of 655 mm one can conclude it
to be an intermediate model from this maker.
As opposed to the first Vicente Tatay Tomas this guitar
is executed in all solid woods: Walnut for sides and back
and a fine grained spruce top. Moreover the tuners were
of a better quality. This one will receive good but not
original tuners as a lot has to be replaced already to
make it playable again, a lot of original parts on this
guitar will disappear or swapped with better parts.
Often the plastic rollers are cracked and selling guitars
with future problems is not my goal.
Nice woods with one crack that still close so a good
inspection and a glueing process with cleats will do the job.
I've succeeded in the end to remove the ugly water and
moisture traces on sides and back.
This is the pre 1973 "ViTaTo label. Around the label
the walnut pattern can be studied. The other B-108
had a mahogany layer on the back glued inside.
Pictures like this are making it clear that the soundboard is
all solid. Besides that the inner Spanish heel can be studied as
well. Exactly sculpted in the same way as in the other guitar.
The sides are even loose from the endblock as are several
glue blocks for the soundboard / sides so together with a
bit deformed top we might be able to correct that with some
newly made transverse and possibly even fan braces. The fan
braces were good enough to have them reglued.
I think, compared to the other B-108, the center piece
between the two halves is missing. Also the sides will
be treated with the so called dessication water. Oxal Acid
mixed with water might be able to remove these
ugly traces. A challenge of course.
And the same thing counts for the top that needs to be
refinished. Most likely I will add French polish to it
in order to make a comparison with the other B-108.
On this picture you can clearly see that besides the edge
binding, several glue blocks (side to the top) are missing.
A proper fix inside will only be possible by removing the
back. As the other B-108 was already a positive surprise
sound wise I think it is worth all the efforts.
Shown here is the back off already. Sometimes the braces on
the back will come with the back itself but here the higher
properly glued braces are still sticked to the sides. Otherwise
I would have let them in the soundbox. When heating the outer
back wood that is glued to the inner heel you can simply remove
the back by twisting it from left to right and thus the upper
braces that are left in the soundbox are making this method
of lifting quite simple.
With the back off it is more easy to make a good picture
of the label and moreover to stick it better to the back.
A finely executed 5 fan bracing and one can see
that in the lower right some glue blocks are missing.
I will try to get rid of the ugly discoloration by the
water (or humidity) damage before proceeding
with the glue work. All excessive glue traces will
be removed and every single glue block will be
controlled before the back will be mounted.
Major problem on this example is the water damage this
guitar has developed in the past. Several attempts have been
undertaken but not yet with the ultimate result. The cracks
in this area will also be treated with the back off.
As there are loose parts near the bottom of the soundbox
I figured it would be better to remove the back and be able
to do some necessary glue work including placing new glue
blocks for the soundboard. Another thing is to remove the
transverse bar just under the sound hole and by remodelling
that one I'm lifting the soundboard a bit. Also therefore that
brace will be strengthened at the outer ends with some
extra studs glued to the sides.
Loose glue blocks are just a part of the problem as the
soundboard edge inlays has to be replaced as well. Some
cracks will be stabilized with extra wooden pieces.
Funnily enough is the prefix "8". most likely
ment to assign this back for a B-108 model guitar.
Another remarkable feature is the solid sides
and back on this furthermore identical model.
As I need to have some patience in working on the next
steps in restoring this guitar, I already removed the copper
frets. In fact not necessary because they didn't had any
wear on them at all but I have to give this guitar a slight
neck reset by shaving of the fingerboard towards the
head. Better fretwork will be installed afterwards.
To stabilize a crack on the right a rosewood piece has been
glued and the same has been done with some smaller cracks
from the fingerboard to the sound hole.
This picture shows the new transverse bar just below the
sound hole. I've added two rosewood braces on the side
to secure that transverse bar while lifting the soundboard
a bit. All the glue blocks will be inspected and reglued
if needed. Before placing the back again some cleaning
is necessary to remove the old glue.
Funnily enough is the prefix "8". most likely
ment to assign this back for a B-108 model guitar.
Another remarkable feature is the solid sides
and back on this furthermore identical model.
As I need to have some patience in working on the next
steps in restoring this guitar, I already removed the copper
frets. In fact not necessary because they didn't had any
wear on them at all but I have to give this guitar a slight
neck reset by shaving of the fingerboard towards the
head. Better fretwork will be installed afterwards.
With the frets removed it is possible to make a sort of a neck reset
by shaving the fingerboard away towards the head. New frets are
a must after that procedure but changing the old copper frets for
better fretwork is an upgrade as well!
Small repair on the inner heel but in fact not necessary
as there is enough glue surface to put the back on again.
In the "moisture" area the old glue blocks have been glued
again and the two missing blocks have been renewed.
two small still closing cracks are equipped with some
cleats to make the soundboard straight again and stable
of course. All the glue blocks have been retreated
with some glue as well. Several treatments with oxalic
acid didn't give a much better result alass..
I gave the soundboard the first treatments with Shellac. These first
layers can be done easily with a brush as the they will sink into
the pores of the wood. A new piece of lining in the lower left will
be done in the next stage. The bridge has been repainted black
as was done originally. Bone for that bridge part will be used of
course and a more easy 12 hole bridge.
For those who have a good colour printer, this is the opportunity
to print a label like this. It is clear that these original labels were
cutted with scissors and not with a genuine paper cutter.
A nice view on the highest frets and will assure
years of playing pleasure.
With the back glued on again I was curious to learn more around
the bodies' own frequency which lies on a comfortable F#.


The unfinished back that has been reglued already. When a
back has been removed, the plantilla of the soundbox will
always change a bit. It certainly also has its' influence on
the final angle of the neck / body. Therefore, before gluing
the back on clamps at the right place on heel and endblock
are placed to inspect that angle for a final perfect playing
action in the end. And that is together with the fingerboard
shaving before placing new frets that is another help in
correcting playing action. On the right the newly made edge
inlay together with some small pieces of wood to fill
the slightly changed plantilla of the soundbox. Most
of the time inevitable after removing the back.
The decision has to be made in how to proceed and that
heavily depends on the sound quality the guitar is providing.
As the soundboard has been thinned a bit and some extra
reinforcements for the sides have been added it remains
a surprise what that sound result is. What is there to expect
from an intermediate guitar? Not this: Beautiful different
tone colors out of this one, together with lots of volume and
a nice balance between the higher and lower strings made
me decide to entirely French polish this guitar
On the lower left side of the soundboard the edge inlay
partly was missing. Of course you can make the decision
to make a whole new edge inlay but this guitar has its'
history and why not be honest about that?
The first layers of shellac has been applied. Before that,
the neck can be "profiled" to your liking but a warning
must be given. You never know beforehand how much
relief the tension of the strings will cause on the wood
of the neck! On a rather cheap, mass produced guitar
the quality of the wood is always questionable.


.jpeg)


